Game Development: Unreal Engine 4 Introduction
Introduction
As Epic Games have recently made
Unreal Engine 4 freely available to the public, I have changed my focus from
learning lower level engine and game programming to learning how to build game
functionality using an existing set of tools. The Unreal Engine is a
fully-featured industry standard game engine, including a map editor, blueprint
scripting, A.I system, physics system, lighting, material and shader pipelines,
character animation, cinematics toolset, and visual effects and particle
systems, and I hope to explore as many of these features as possible.
The knowledge I have gained in my
initial learning of game programming with MonoGame is a great foundation that
gives me a deeper understanding of the functionality I am using in Unreal
Engine. For example, while I might not know the exact steps the shader pipeline
is taking as it builds lighting and materials, I have some concept of how it
builds light, shadow and reflection maps and combines them with the output of
material shaders to render the final scene. I was pleased to see that the input handling class I had built
in MonoGame had similarities with UE’s system of mapping inputs to actions and
using the actions’ events to trigger game logic.
Blueprints
Game functionality in UE4 is
built using the Blueprint visual scripting system, which is used to create game
objects and content with interactivity and logic. From a developer’s point of
view, a blueprint is equivalent to a class, one that is designed through graphical
interfaces and can be instantiated in the game world including 3D models,
materials, audio, lighting and behaviours. As with any class in the world of
programming, a Blueprint class can contain variables, functions, interfaces and
enumerations. The Blueprint Editor contains 3 primary tabs: The Viewport, which
allows us to create the visible part of the Blueprint object, the Construction
Script, which fires whenever a blueprint object is instantiated or modified,
and the Event Graph, in which the blueprint's logic is defined.
For my first Blueprint, my aim
was to create a set of sliding doors. I started with the First-Person template
included in UE, which includes a player character and controls for camera and
character movement. I built the 3D model for my door in Blender, unwrapped the
UVs for texturing and applied basic materials, and exported it as an .fbx file.
Importing this into UE, I scaled the mesh uniformly by 50 using the import tool, as Blender
uses different units to Unreal. Having UV mapped the mesh, I was able to
replace the imported materials with some better-looking materials included in
the project's starter content.
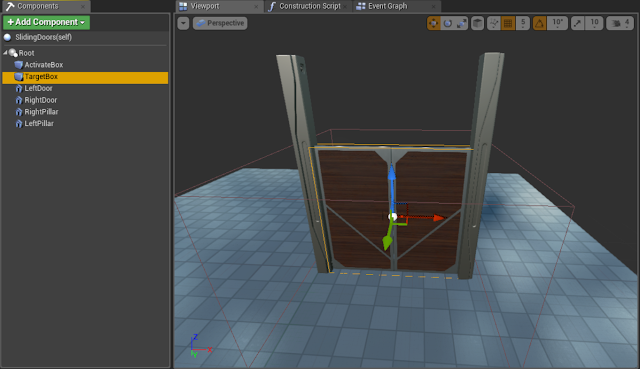
In the Viewport of my new blueprint, I started by added a Scene component as
the root of the object, with a pair of door meshes as its children. By using
the Scene root, I can scale, rotate and translate each door, as well as any
other component I add to the blueprint, independently of each other, as they
are all on the same level of the blueprint’s object hierarchy. Any component
that is the child of another component will have its parent’s transformations
applied to it.
Next, I added two box collision components, which are used to provide
interactivity with the blueprint. The first, larger box, the ActivateBox, which
extends beyond either side of the doors, is used to detect if the player is
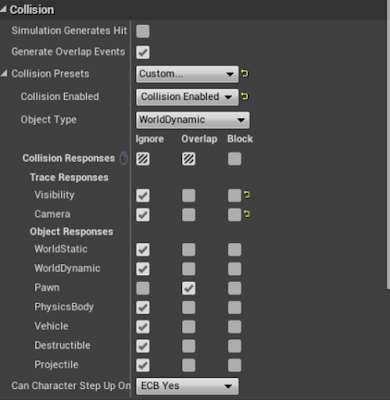
nearby. I modified the volume's collision settings to ignore all objects except
for overlaps with a pawn (i.e. the player):

The TargetBox, which bounds both
doors, is used to trigger the opening and closing of the doors. All collisions
are disabled for this box, as the interaction functionality will be handled separately
in the blueprint's event graph.
To allow the player interact with
the sliding doors when it is nearby (i.e. overlapping with the ActivateBox), I
created the Interact interface, which has a single OnInteract function. I then
modified the player character blueprint to call this function for all objects
it overlaps with when the Interact action is performed, allowing the player to
interact with multiple overlapping objects at the same time:
In the Sliding Doors blueprint’s
event graph, I use the TargetBox to determine if the blueprint’s functionality
should be fired when it receives an OnInteract event. The blueprint performs a
ray cast from the centre of the player’s view along its forward vector and
checks if the trace intersects the TargetBox. If it does, the doors are toggled
open or closed:
I keep track of the current state
of the doors in the DoorIsClosed Boolean, using a Branch node to open the doors
if closed, and vice versa. The movement of the doors is handled by a Timeline,
which returns a changing X-value over time. I add this value to the initial
location of the door (which I store when the game starts) and use the result to
set its relative location. If the door is open, the timeline is played in
reverse to return it to its original location. Setting its relative location
means it is using the blueprint’s local coordinate system rather than the world
coordinate system, allowing the doors to have the same movement regardless of
what rotation, location or scale each instantiation of the blueprint has.

| Door position Timeline |
Finally, when the player leaves
the bounds of the ActivateBox, the OnEndOverlap event fires, triggering a delay
that automatically closes the doors after a few seconds:
Subscribe to:
Post Comments
(
Atom
)


No comments :
Post a Comment